The winter can be an exciting time when it comes to garden planning, especially if you are starting plants indoors. It is gratifying to have your garden dreams, whether they be beautiful flowers or bountiful vegetables, sprouting in your own home with relatively little work and expense overall. In addition, with many of us home this winter, it is easier to keep an eye on those remarkable little seedlings and share the caretaking experience with your family.

If you’ve never started seeds indoors, don’t be intimidated. The steps are outlined below, and if you’d like to watch a video before you start, here’s the link: Video/Starting Seeds Indoors/Univ.Md.Extension.
The first step, if you are planning to start seeds at home, is to read the back of the seed package very carefully and determine the germination requirements for the plant you are hoping to sprout. Some seeds germinate in the dark, (e.g. tomato and peppers), while other seeds require special treatment (e.g. scarification – breaking seed surface — or stratification – chilling). Next, there is the calendar planning. Determine the last frost date for planting in your area and simply subtract the weeks necessary for sprouting to know when you will need to start the seeds in your home. All of this information is clearly outlined on the back of the seed package. For expert advice on timing, take a look at the VCE’s “Home Garden Vegetable Planting Guide,” Va.Coop.Ext.

The most important consideration and investment for starting seeds at home is the light source. Light is the secret to successful seedling growth. The light from a window is usually inadequate, so most gardeners use fluorescent lights, often called “shop lights” at the hardware store. LED grow lights are also gaining popularity but come at a slightly higher cost. For the least cost, T5 High Output (HO) fluorescent lights are still the favorite as they can be used for all phases from germination to vegetative growth of your plants. For detailed information on your light options, see Kansas St.Ext./Lighting options for starting seed (LEDs vs. Fluorescent), and Univ.Maryland Ext./Grow Lights.
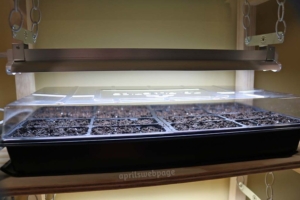
Any room in your house can be used for seed starting as long as you have a good light source in place. A typical setup might be a counter or a couple shelves, with two standard size trays (or flats) under one 4 ft. long fluorescent fixture with two tubes. You can grow four trays under two fixtures.
Next, gather the following essentials:
• A growing medium free of weeds, insects and diseases (e.g. soilless seed starting mix that is labeled sterilized and usually made from peat moss, perlite, coconut fiber, and/or vermiculite)
• Clean containers with good drainage (e.g. recycled cottage cheese containers, yoghurt containers, egg cartons, cardboard containers, paper containers, plastic salad containers). You can buy plastic trays (flats) that are 10.5 in. × 21 in. × 2 in. deep and contain drainage holes, or perhaps you have old ones you can re-use.
• Clean source of water, which you’ll need to apply via spray (e.g., spray bottle or gentle nozzle) or through bottom watering
• Heat source to achieve soil temperature 65-75°F (e.g., special heat mats for seed starting, or the top of a water heater, top of refrigerator, or nearby radiator/space heater)
Procedure for Germination
Now that you have all of the critical elements for seed starting, you are ready to begin with these simple steps:
- Moisten sterile medium and then place it in your container to within 3/4 inch of the top
- Plant your seeds.
- For flats, make rows about 1- to 2-inches apart and 1/8” to 1/4” deep across the surface (this formula works for all small to medium-size seeds, which covers all crops except cucumber, squash, melons, corn, beans).
- For small pots, plant 1-3 seeds/container.
- Moisten again, cover with plastic wrap or dome lid
- Place in warm area or on heat mat
- Insure all containers are labeled

Cotyledon and one true leaf of a cucumber. Photo: Gerald Holmes, Strawberry Center, Cal Poly San Luis Obispo, bugwood.org
After your seedlings germinate, you can remove the plastic cover and expose the containers to your light source for 12-16 hours/day. If using artificial light, keep the light source 3-6 inches above the seedlings, and keep the soil moist, but not wet, at all times. Soon the first set of true leaves will appear, which is the sign of success in starting your seeds. The true leaves appear after the “seed leaves” or cotyledons, both of which are pictured at right. Continue with the long hours of artificial lighting, keeping the light approximately 4 inches above the seedlings. For best results, your seedlings need slightly cooler temperatures at night, (55-60°F), and somewhat warmer temperatures during the day (65-75°F).
Once your seedlings have the first set of true leaves, competing seedlings must be removed to prevent crowding. This can be done by snipping out the competing seedling or using a cocktail fork or other small implement to gently remove. Since all the nutrients in the seed have been used up for sprouting, the application of a dilute all purpose fertilizer or organic fertilizer (e.g. fish emulsion) at half strength, once a week, is recommended.
At this point, many gardeners choose to transfer their sprouted seedlings to larger, sterile containers for hardening off. Hardening off is the process of gradually introducing your seedlings to the outdoors; this is an essential step before planting them in the ground. When the time for outdoor planting is a week or two away, place your seedling containers in a protected and shaded area for the majority of the day, bringing them in at night. Continue this procedure for one to two weeks. Caution is exercised to avoid strong winds, freezing temperatures, or excessive watering. A watchful eye at this stage is especially important to insure optimal conditions that discourage damping off.

Once the hardening off stage is completed, you are ready to plant your seedlings in the ground. Handle with care as you gently guide the seedling directly into the soil. If your seedling is in a peat pot, this pot can be buried in the soil as long as the entire pot is below the soil line to prevent water wicking from the soil.
Now you can enjoy watching your garden grow. You have saved considerable expense by starting your own seeds and your time investment will pay off in terms of the diversity of unique flowers and vegetables you will be able to enjoy. Any leftover seeds may be stored in a sealed container and kept dry and cool for next season. Next year you can test the viability of these seeds by placing a few seeds on a folded moist paper towel inside a plastic bag. After a couple of days in a warm place, you will be able to determine if your seeds are still viable. Accurate record keeping throughout your seed starting endeavors will help capture lessons learned for next year.
Easy flowers to start from seed include: zinnias, sunflower, sweet pea, marigolds, globe amaranth, cosmos, calendula and bachelor’s button.
Easy vegetables to start from seed include: turnips, beets, radishes, beans, carrots, kale, chard, arugula, lettuce, peppers, okra, tomato, zucchini, melons, summer squash, cucumbers.
References
Starting Seeds Indoors/Univ.of Maryland Extension
Plant Propagation from Seed, Virginia Cooperative Extension Pub. No. 426-001, Pub. No. 426-001, Enhanced Digital Version
“Starting Seeds Indoors,” The Garden Shed, Mar. 2016 (C.Campbell)
“Damping-off in Flower and Vegetable Seedlings,” NC State Extension Publications, Ornamental Disease Information.