It’s spring and time to finish all the ornamental gardening chores that weren’t completed in March. It’s also the time of year when garden centers and nurseries beguile us with their wanton displays of botanical eye candy. So, let the planting begin!

GENERAL APRIL CHORES IN THE ORNAMENTAL GARDEN
Top-dress established ornamental flower beds with an inch of compost. Work the compost into the loosened soil about 2 weeks before planting. Also, if you haven’t had your soil tested in the past couple of years, collect a soil sample and submit it for analysis in accordance with the Virginia Cooperative Extension’s instructions (Soil Sampling Instructions). The cost is $10 per soil sample and well worth the investment.
Re-edge flower beds with a sharp-edged spade or half-moon edger, removing any grass or weeds that have encroached into your flower beds. Clarifying the boundary between lawn and flower bed is one of the best ways to give your ornamental garden a neat, polished look.
Mark any clumps of daffodils that need to be divided. Ideally, daffodils should not be divided until after the foliage dies back, which is normally six to eight weeks after the bulbs finish blooming. Once the foliage dies, however, it is often difficult to locate the exact site where the bulbs are planted. While the foliage is still green, mark the outer boundaries of the clumps in some way so that you can easily find them later. This will also help you to avoid accidentally damaging the bulbs when you go to dig them up. Old golf tees or plastic straws are useful for this purpose. Tip: For next year’s garden, plant daylilies (or other favorite summer-blooming plants) in front of daffodil clumps. As the daffodil foliage dies back, it will be camouflaged by the emerging daylily foliage.

Inspect ornamental garden beds for tunnels or other signs of soil disturbances caused by voles. These prolific rodents are vegetarian and can cause a lot of damage to ornamental plants. They tend to tunnel under mulch and eat the roots of perennials, such as Irises, hostas, sedum, and spring bulbs. In winter, when little else is available for them to eat, they frequently gnaw the bark of young shrubs and trees, again burrowing under mulch to hide their tunnels. To learn about vole damage control methods, see the Penn State extension’s publication on Voles.

Remove broadleaf winter weeds before they set seed. These cool-season weeds include chickweed, deadnettle, hairy bittercress, and henbit. They germinate in late summer or early fall, overwinter in your lawn and flower beds, and produce flowers and seeds in spring. Pull them by hand before they develop seeds. You can suppress their growth in your flower beds by applying a layer of mulch over bare ground. Tip: The University of Illinois Extension’s on-line publication on Weed Identification contains a number of useful close-up photos of weeds.
Stay attuned to the weather and protect any ornamental plants that might be vulnerable to a sudden dip in overnight temperatures. A row cover, old sheet, cardboard, or thick layer of newspapers will generally suffice as protection from the cold. Tip: Don’t forget to remove the covers by next morning so that your plants don’t become overheated during the day.
SPRING CARE AND MAINTENANCE OF HERBACEOUS AND WOODY PLANTS
Early spring is the ideal time to divide summer- and fall-blooming perennials while the foliage is just a few inches tall. Wait until later in the summer (July) to divide Irises and Oriental poppies and autumn to divide daylilies and peonies. If you’re new to dividing plants, here are a few general guidelines.
- Water the plants well the day before you divide them. This softens the soil making your task easier on both you and the plants.
- Select a cool, preferably overcast day in early spring to divide your plants so that the divisions become established before hot summer weather arrives.
- Using a spade or gardening fork, dig up the entire plant, being careful to damage the roots as little as possible. If the plant is too difficult to dig up, try removing only a portion or two of the plant, leaving the remainder of the root ball in place.
- Divide plants with shallow root systems by gently pulling or teasing the roots apart by hand. For plants with dense root systems, slice through the thick or woody crowns with a knife, handsaw, or sharp-edged spade. If this doesn’t work, try inserting two gardening forks or pitchforks back to back into the root ball and gently pry it apart. For plants with tuberous roots or rhizomes, cut them apart with a sharp knife, making sure each rhizome or tuber has at least one growth point or dormant bud.
- Plant the divisions at the same depth as the original plant with the crown just slightly above the soil level.
- Thoroughly water in the newly transplanted plants and protect them from bright sun until they become acclimated to their new environment.
For additional information on dividing perennials, see Clemson University Publication HGIC-1150, Dividing Perennials or the Virginia Cooperative Extension Publication 426-203, Perennials: Culture, Maintenance and Propagation.
Pinch back chrysanthemum foliage when the plants are about four to six inches high. This keeps the plant from getting leggy and falling over in autumn, plus it encourages the plant to develop more blossoms. The National Chrysanthemum Society, USA website recommends pinching the foliage back about one inch and then periodically repeating the process each time the plant grows an additional six inches. Although their website recommends this growing and pinching process until the end of August, most other sources recommend stopping this practice around mid-July to give the plants ample opportunity to form flower buds.
Prune hybrid roses when bud growth starts in early spring. Before making the first cut, look at the overall architecture of the plant. Specifically look for and remove dead wood, the smaller or weaker of two crossing branches, thin (smaller than the diameter of a pencil) branches, interior facing branches, and inward facing buds. When making cuts, prune back to just above an outward-facing bud. As you make your cuts, look for any branches that have a hole in them, signaling cane borer damage. The interior wood surrounding the hole will usually be brown or tan. Cut the branch back until you reach white wood. As you prune, clean up any leaves or other debris from around the base of the shrub.
Install stakes or ring-type supports for peonies and train the foliage inside the ring. Don’t put this off! Peonies have a tendency to grow several inches practically overnight. It’s much easier to deal with the foliage when it’s only a few inches tall.

Trim back tattered or freeze-damaged Helleborus foliage in early spring. The current season’s flowers emerge from the center of the plant and are more appealing without the distraction of the old foliage. Epimedium, Heuchera, Heucherella, Tiarella, Liriope, Bergenia and some ferns are other perennials with evergreen or semi-evergreen foliage that may need to be cut back or spruced up in early spring. As you tidy these plants, be careful not to snip new, emerging basal foliage or flower stalks by accident.
CARE AND MAINTENANCE OF HARDSCAPE FEATURES
Inspect dry-stack stone walls to make sure they are in good repair. They have a tendency to shift during the winter months. A few minor adjustments may be all that’s necessary, but if you observe any significant shifting of the stones, arrange for repairs before the damage worsens.
Inspect and reposition any stepping stones or pathway elements that shifted over the winter as the result of alternating freezing and thawing cycles.
Inspect birdhouses and thoroughly clean them out if you didn’t get around to this chore in late winter or earlier this spring. Tighten or replace any loose hinges or screws. Assuming the structures are uninhabited, clean them out thoroughly. Remove last year’s nests and any accumulated fecal or clumped matter. Wipe down the inside with a mild bleach solution (one part chlorine bleach to nine parts water). The idea is to remove any parasites, fungi, or bacteria that might be harmful to this year’s avian residents. Rinse well to remove any traces of bleach and allow the structures to air out for several hours before you reassemble them.
Inspect ponds or other water features and clean out leaves and other debris as needed before the water begins to warm up. Seasonal maintenance requirements may differ depending on the type of water feature you have. In general, check pumps to make sure they are clean and working correctly. Pond filters should also be checked to make sure they are clean.
EARLY SPRING PLANTING TIPS
Early in the month, plant cool-season annuals that can tolerate a light frost. Pansies, of course, are the quintessential cool-season annual that comes to mind but there are lots of other choices for early spring. For example, calendulas, larkspur, love-in-a-mist, sweet alyssum and sweet peas all may be direct sown in the garden now. Some cool-season annuals that are best started indoors for transplanting after the last frost date include: forget-me-nots, lobelia, painted tongue, and snapdragons. Don’t forget to harden off the seedlings before planting them outside.
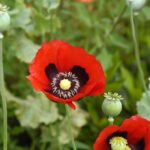
For brilliant color in your garden, consider growing some poppies. If you were lucky enough to see the dazzling display of corn poppies at Monticello last spring (2016), you were in for a treat! Poppies belong to a diverse family of annuals, biennials, and perennials. Here’s a brief description of the poppy species most commonly grown in Virginia:
- Papaver rhoes
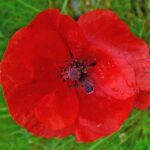
Corn Poppy – This annual form of poppy is commonly known as corn poppy or Flanders poppy – the bright red form associated with Flanders fields. Poppies thrive during cool, moist weather, so sow the seeds very early in spring or even in the fall for bloom early next summer. Popular Shirley poppies are a type of corn poppy with ruffled petals and may be either single or double flowered.
- Papaver eschscholtzia
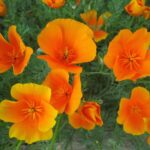
California Poppy – This is the native California poppy that grows wild all along the west coast of the United States. An annual form, it blooms from June to autumn in brilliant shades of golden yellow, orange, red, pink, and violet. Deadheading encourages plenty of new blossoms, but let some go to seed in the fall for next year’s garden.
- Papaver nudicaule
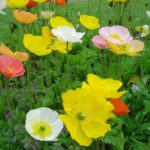
Iceland Poppy – Iceland poppy is a long-blooming, short-lived perennial with delicately ruffled blossoms that can be sown in early spring for a floral display from midsummer into fall. Deadhead to keep the floral display going.
- Papaver orientale
Oriental Poppy – The Oriental poppy is a perennial form that only blooms for a few weeks, but its large, intensely colored blooms make it an outstanding addition to the spring ornamental garden.
- Stylophorum diphyllum
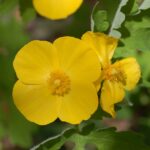
Celandine Poppy – The Celandine poppy is a native perennial wildflower with brilliant yellow flowers and handsome, deeply cut foliage. It is perfect for naturalizing a partially shady garden in spring, after which it goes dormant for the rest of the growing season. Unlike the other poppy species, which prefer full sun and well-drained soil, this native prefers moist, humusy soil and part shade.

SPRING PESTS AND DISEASES
With the arrival of spring comes the start of the annual battle with insects, such as leafminers. Leaf miners are the larvae of moths (Lepidoptera), sawflies (related to bees and wasps and members of Hymenoptera suborder Symphyta) and flies (Diptera). The larvae tunnel into and devour the inner layers of the leaves, leaving round or winding, white tunnels. The tunnels are commonly found on the foliage of columbine (Aquilegia) and roses. While the damage doesn’t actually harm the plant, it can look unsightly. Chemical controls, such as Spinosad or BT, can be used but may not be necessary. It’s usually easier to snip off the damaged leaves or simply ignore the problem if it’s not too pervasive.

Boxwood leafminer damage is a more serious problem. The small, delicate adult flies are generally seen in late April and early May, but it’s their larvae that cause the damage. As the larvae feed on the leaves, they cause unsightly blisters to develop in the leaf tissues. While chemical means may be employed to combat this pest, organic methods may be sufficient. Green lacewings and spiders are natural leafminer predators. Other strategies include timely pruning of damaged foliage in spring and selecting boxwood species that are resistant to leafminer damage. A number of reliable sources for information on boxwood leafminers are available including Virginia Cooperative Extension (VCE) Publication ENTO-42NP on Insect and Mite Pests of Boxwood; VCE Publication 426-603 on Selecting Landscape Plants: Boxwoods; the Missouri Botanical Garden’s publication on Boxwood Leafminer; and the North Carolina State University’s Department of Entomology Insect Note, also called Boxwood Leafminer. Tip: For help identifying insects, see Bugs and Other Insects from the State of Virginia.

PEONY BOTRYTIS BLIGHT – If you witnessed botrytis blight on your peonies last year, it’s likely that the disease will recur this year. The fungus that causes this disease of peonies, Botrytis paeoniae, manifests itself in several ways: brown or black masses of fungal spores on peony leaves and stems, collapse and rot of young shoots at ground level, or bud blast (flower buds that turn black or brown and prematurely abort either shortly before or after they open). To treat for this disease, spray newly emerging peonies with an approved fungicide when the plants are 2 to 4 inches tall. If you’re not sure what fungicide to use, contact the local Virginia Cooperative Extension office Helpdesk (albemarlevcehelpdesk@vt.edu) for advice. You may need to do follow-up treatments as a precaution. Always follow instructions for the use of fungicides precisely as they are written on the container and make sure the fungicide is specifically for the type of fungal problem being treated. The Missouri Botanical Garden’s website provides a very good in-depth description of Botrytis Blight of Peony as well as photos and several integrated pest management strategies for preventing or controlling the disease.
SPRING HOUSEPLANT CARE
Although April can have some very warm days, don’t be in a hurry to move your houseplants outside just yet. Night-time temperatures need to be consistently 50 degrees or higher, which normally doesn’t occur until either very late in April or in May. In the meantime, begin readying your houseplants for the move outdoors. Repot any plants that are root-bound. Increase the pot size by one inch and use fresh potting soil. If you plan to re-use pots from previous growing seasons, scrub them out thoroughly first.
With the advent of spring, your houseplants should begin to show new growth. Begin to fertilize them with a slow-release fertilizer or with fish emulsion.
Begin fertilizing orchids that have finished blooming. With every watering, use either fish emulsion or a very dilute (about one-quarter strength) fertilizer made specifically for orchids.